Introduction
 A simple game which is an ideal introduction to Scratch programming as a basic version of the game
 can be played with very little programming. Additional features can be added to increase the level of challenge in stages - each one making a playable game. It also introduces a reasonable range of foundation programing techniques.
List of techniques
- Painting backgrounds
- Painting Sprites
- Changing Sprite costumes on collision
- Controlling Sprite direction with keyboard keys
- Green flag scripts
- Forever loops
- If loops
- Duplicating Scripts
- Duplicating Sprites and Scripts
- Detecting collision with touching colour?
- Detecting collision with touching Sprite?
- Using say to communicate with the player
- Using a variable for Lives
- Using a Timer to stop the game
- Editing Scripts
Tutorial
| After loading the program, the first step is to draw the background for the Stage on which the game will be played. Click on the icon for the Stage beside the Sprite List Area. Next, click the Backgrounds tab above the Script Area Then click the Edit button beside the icon for the Stage (background1) |
 |
|
 |
This will take you to the Paint Editor Click a green colour in the Colour Palette Then click the Fill Bucket in the toolbox Now click anywhere on the canvas to fill it with green colour |
|
| Click a dark grey colour in the Colour Palette Click the Paintbrush Tool in the toolbox Click on Brush Size in the Options Area and then click on the largest the diameter brush size |
 |
|
 |
Draw a race track circuit on the canvas. In my case, I've included an S bend to make the driving more interesting and a straight section at the base of the screen with a starting-grid. If necessary, click Undo to start again. Click OK when done. |
|
| We now need to delete the Scratch the Cat Sprite (Sprite1) Right-click (Ctrl-click on a Mac) the icon for Scratch the Cat (Sprite1) and then click delete on the pop-up menu |
 |
|
 |
Now click the Paint new sprite button above the Sprite List Area | |
| In the Paint Editor, click a red colour on the Colour Palette and then the Circle Tool in the toolbox On the canvas draw a cigar shape to represent an aerial view of the racing car. |
 |
|
 |
Now add four wheels by clicking black in the Colour Palette and then the Paintbrush Tool in the Toolbox Now draw a black line on each of the four opposite 'corners' of the car body |
|
| Add further details (eg the cockpit and driver) and then click OK when done. |  |
|
 |
Drag the car sprite to the starting grid of the track on the Stage Area Now click the Control button above the Blocks Palette and then drag a when Green Flag clicked block from the Blocks Palette to the Script Area. |
|
| At this stage (or later) you might want to re-size the car Sprite. To reduce its size, click the Shrink Sprite button above the Stage on the left, then keep clicking on the Sprite until it is the right size. If you become over-enthusiastic, you can increase the size of the Sprite with the Grow Sprite button next the Shrink Sprite button |
 |
|
 |
Click the Motion button and then from the Blocks Palette, drag a go to x:[ ] y: [ ] block into the Script Area and attach it beneath the when Green Flag clicked block. The co-ordinates on the block should show the current position of the Sprite on the Stage (which is why we dragged it to the starting-grid) Now drag a point in direction [ ] block into the Script Area and attach it beneath the go to x: [ ] y: [ ] block. If necessary change the direction to 90 by clicking on the pane and selecting 90 (right) from the drop-down menu |
|
| Click the Control button to bring up the Control Blocks in the Blocks Palette From the Blocks Palette drag a Forever loop block into the Script Area and attach it beneath the point in direction [90] block |
 |
|
 |
From the Motion Blocks Palette, drag a move [10] steps block and insert it into the Forever loop in the Script Change the value of the steps to 1.5 by clicking on the pane and typing in 1.5 |
|
| Time to test the Script Click the Green Flag button on the right above the Stage Area. The car sprite should move across the Stage. Clicking the Green Flag button again will return the car to its starting position to begin its journey again Notice that the Script is outlined in white whilst it is running. To stop the Script, press the Red button beside the Green Flag button |
 |
|
 |
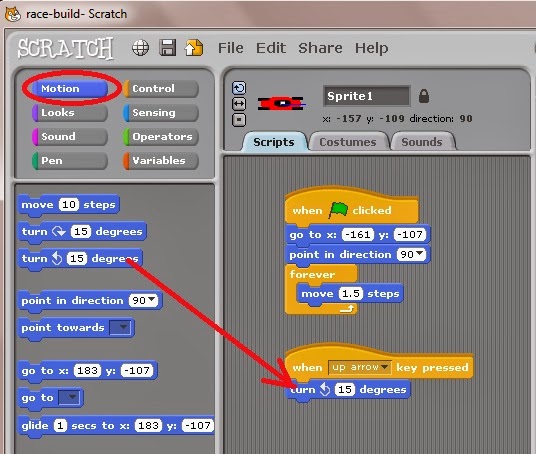
We now need to add some means for the player to contol the car From the Control Blocks Palette, drag a when [space] key pressed block into the Script Area Change the block to read when [up arrow] key pressed by clicking on the pane and clicking on up arrow in the drop-down list. |
|
| From the Motion Blocks Palette, drag a turn anticlockwise [15] degrees block into the Script Area and attach it beneath the when [up arrow key pressed block |
 |
|
 |
You can now test the Script by pressing the up arrow key on the keyboard. You can also test it by clicking the Green Arrow button and then pressing the up arrow key. (Click the Red button to stop the Green Flag Script) | |
| To turn the car Sprite in the opposite direction, we could repeat the above procedure but another way is to duplicate the Script and edit it. Right-click (Ctrl-click on a Mac) on the when [up arrow] key pressed block and select duplicate from the pop-up list |
 |
|
 |
Edit the when [ ] key pressed block in the new script to read when [down arrow] key pressed | |
| We now need to change the direction the Sprite rotates when the down arrow key is pressed. Remove the turn anticlockwise [15] degree block from the Script by dragging and dropping the block into the Blocks Palette Area. |  |
|
 |
Drag a turn clockwise [15] degrees block from the Motion Blocks Palette into the Script Area and attach it to the when [down arrow] key pressed block You can now test the game to find out how easy it is (or not) to steer the car around the track. If you feel the track is too difficult to negotiate you can re-draw it by clicking the Stage icon, and then clicking the Edit button. |
|
| We now need to detect when the car Sprite leaves the track. From the Control Blocks Palette, drag an If loop block into the Script Area and insert it into the Forever loop in the when Green Flag clicked Script, beneath the move [1.5] steps block |
 |
|
 |
From the Sensing Blocks Palette, drag a diamond-shaped touching colour [ ] ? block into the Script Area and insert it into the diamond-shaped pane in the head of the If loop block. |
|
| Click the colour pane in the touching colour [ ] ? block and then click on any part of the green background colour of the Stage Area with the eye-dropper mouse-pointer This will transfer that colour to the pane in the touching colour [ ] ? block |
 |
|
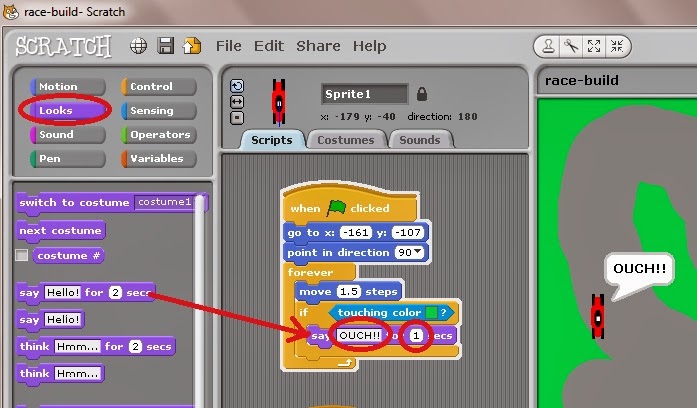 |
From the Looks Blocks Palette, drag a say [Hello!] for [2] secs block into the Script Area and insert it into the If loop of the Green Flag Script. Edit the block so it now reads say [OUCH!!] for [1] secs Now test the Script by deliberately driving off the track. |
|
| To make the crash more interesting, we can change the appearance of the car Sprite when it leaves the track Click the Costumes tab above the Script Area and then click the Copy button beside the icon of the car Sprite (costume1) |
 |
|
 |
Click the Edit button beside the icon for the car Sprite (costume2) | |
| Use the Paintbrush Tool to add some smoke and flames to the front of the car image on the canvas Click OK when done |
 |
|
 |
To make use of this new costume, we need to remove the say [OUCH!!] for [1] secs block by dragging it out of the If loop and dropping it in the Blocks Palette Area. | |
| From the Looks Blocks Palette, drag a switch to costume [ ] block into the If loop and, if necessary, change the block to read: switch to costume [costume2] |
 |
|
 |
From the Control Blocks Palette, drag a wait [1] secs block into the If loop below the switch to costume [costume2] block | |
| From the Looks Blocks Palette, drag a switch to costume [ ] block and insert it below the wait [1] secs block If necessary, edit the block to read switch to costume [costume1] |
 |
|
 |
Test the Script by pressing the Green Flag button. You will notice that sometimes the car Sprite starts the game in its crashed costume, particularly if the game is stopped after the car has crashed |
|
| To cure this bug, stop the game (with the Red button) and then from the Looks Blocks Palette, drag a switch to costume [ ] block and insert it into the when Green Flag clicked Script immediately below the when Green Flag clicked block. If necessary, edit the block to read switch to costume [costume1] Play the game a few times to see the effect of this change |
 |
|
 |
We could leave the game as it is, but it might be useful to have some means of ending the game automatically. Let's give the player a number of lives which are lost each time the car crashes. To do this we need a variable. Click the Variables button and then the Make a variable button. In the pop-up window, type Lives as the Variable name, and then click OK. |
|
| Drag a Set [Lives ] to [0 ] block and insert it into the Green Flag Script immediately below the when Green Flag clicked block (It doesn't matter exactly where it goes in this part of the Script as long as it is before the Forever loop block). Edit the block so it reads set [Lives] to [10] Drag a change [Lives] by [1] block and insert it into the If loop of the Green Flag Script below the switch to costume [costume1] block (or thereabouts). |
 |
|
 |
Play the game. You will see that the Lives are shown on the Stage and reduce by one life each time the car crashes. You will also notice that nothing happens when the Lives counter reaches zero, except that the Lives become negative. | |
| Stop the game and, if necessary, drag the Lives counter to somewhere on the Stage where it does not obscure the track. |  |
|
 |
We now need the Script to detect when the Lives variable reaches zero From the Control Blocks Palette, drag an If loop block and insert it into the Forever loop beneath the end of the If touching colour [ ] ? loop. |
|
| From the Operators Blocks Palette, drag a diamond-shaped [ ] < [ ] block and insert it into the diamond-shaped pane in the head of the new If loop block |  |
|
 |
From the Variable Blocks Palette, drag a Lives label block and insert it into the first pane of the [ ] < [ ] block. Type 1 into the second pane of the [ ] < [ ] block so the If loop block header now reads if [Lives] < [1] We could have made the block header read if [Lives] = [0] but setting it to test when the number of lives falls below 1 is more reliable (see below) |
|
| From the Control Blocks Palette, drag a stop all block and insert it into the if [Lives] < [0] loop Now test the game. When the number of Lives reaches zero the game will stop. If you feel 10 Lives are too many, change the set [Lives] to [10] block at the beginning of the Green Flag Script to something smaller such as 5 or 3. At present, nothing much happens when the game ends so let's add something to inform the player that the game is over. |
 |
|
 |
From the Looks Blocks Palette, drag a say [[Hello!] for [2] secs block and insert it into If [Lives] < [1] loop above the stop all block. It is important that this block comes before the stop all block otherwise the script will stop before the message is displayed. Edit the block so it reads say [Game Over!!] for [2] secs Now play the game to see the effect of this change. |
|
| To make the game a little more interesting, we'll add a timer to show how long the game has been played before the Lives run out. From the Sensing Blocks Palette, drag a reset timer block and insert it beneath the set [Lives] to [10] block. Click the checkbox beside the timer label block to make the timer show on the Stage Area If necessary, drag the timer to somewhere on the stage where it does not obscure the track |
 |
|
 |
Rather than having to remember our fastest time, it would be useful if the game did this for us. Make a variable called Longest time |
|
| Rearrange the variable displays on the Stage. |  |
|
 |
Add a new If loop to the If touching colour [ ]? loop in the Green Flag Script. | |
| Add a [ ] > [ ] block to the header of the If loop block |  |
|
 |
Insert a timer label into the first pane of the greater than Operator block ......... | |
| ......... and a Longest time Variable label into the second pane |  |
|
 |
Insert a set [ ] to [ ] block into the If loop and edit the block to set [Longest time] .......... | |
| ... ...... to [timer] Now test the game a few times to check the Longest time variable updates |
 |
|
 |
The game is quite playable as it is, but to make it more challenging, let's add a computer-controlled competitor car. To save time and effort, we'll duplicate the first car by right-clicking (Ctrl-click on a Mac) on the icon for the Sprite and selecting duplicate. |
|
| We'll change the colour of the new car Sprite. Click on its icon in the Sprite List Area and then click the Costumes tab. Now click the Edit button beside the icon for Costume1 |  |
|
 |
In the Paint Editor, select a colour for the new car Sprite (eg Blue) and then the Fill Bucket. Click on the red colour on the image for the car Sprite's body on the canvas to change the bodywork to the new colour. Click OK when done. |
|
| We'll now turn our attention to the Script. If you want to make the game a 2-player game you'll need to change the keys used to control the second car and also add a new variable for keeping its score. Click the Scripts tab We're going to make this car computer controlled, so remove the two scripts for controlling the car. |
 |
|
 |
Separate the first part of the Green Flag script, keeping the Motion blocks together. Detach the Forever loop from them (though this is not absolutely necessary). | |
| Remove the first three blocks from the Script Area |  |
|
 |
Start the game and then stop it immediately to see the starting positions of the cars. Drag the new car Sprite to a new starting position on the starting grid on the Stage and with the mouse-pointer over the centre of the car, make a note of its co-ordinates (shown in the bottom right corner of the Stage Area). | |
| Enter these co-ordinates in the go to x: [ ] y: [ ] block in the Script Area and then attach the two Motion blocks to the when Green Flag clicked block |  |
|
 |
Re-attach the Forever loop to the two Motion blocks | |
| Remove the touching colour [ ]? block from the head of the first If loop block We are not going to worry about the computer controlled car leaving the track (see below) |
 |
|
 |
Instead, we are going to check if it touches the player's car. So, insert a touching [ ]? block in the head of the If loop block and Edit the block so it now reads: if touching [Sprite1]? |
|
| Drag out the contents of the first If loop by dragging the first block in the loop (ie the switch to costume [ ] block) and dropping it in an empty part of the Script Area. |  |
|
 |
Separate out the switch to costume [ ] blocks from the script ....... | |
| ........ and remove them from the Script Area. |  |
|
 |
Reassemble what remains of the Script .......... | |
....... inside the If loop |
  |
Insert a point towards [ ] block into the Forever loop above the move [ ] steps block Edit the block so it now reads point towards [Sprite1] This will ensure the computer-controlled car follows the player-controlled car, wherever it goes on the Stage |
| Now change the move[1.5] steps block to read move [1] steps This will make the pursuit car a little slower than the player's car ......... However, as the pursuit car can leave the track without penalty, the player will need to think carefully about which course to take to make it more difficult for the computer-controlled car to catch it. Play the game a few times to see how much more difficult it is. |
 |
Extensions
As can be seen above, this game can be adapted and modified in all sorts of ways to make it more interesting and/or challenging. Here are a few ideas:
- When the timer reaches a certain point, increase the speed of the pursuit-car (see right for one suggestion)
- Change the track shape after a certain number of laps - you could add a variable which counts laps when the car crosses a finish line (eg when touching colour [white]? and then have several costumes for the Stage area which it switches to
- Add another computer controlled car which travels at a different speed
- Add the need for pit stops when the car runs short of fuel (another variable)
No comments:
Post a Comment